Tuesday 5 April 2016

Fun cube and dashboard


We got given a FubCube Pro-Plus to play with so I set this up on a 2/70 co linear white stick antenna and installed funcube dashboard on windows 7 laptop 
You need to initially go into file--settings and in audio tab, change input device to *line Fun-cube Dongle V2.0*
each pass you will need to select the Frequency preset to the desired Fun-cube satellite you wish to monitor. In the Warehouse tab you will need to add your account details, you can register here


You can track fun-cube 1 satellite here
You can track fun-cube 2 satellite here 


Once set up you will want to put a check in the auto tune option on the bottom left of the screen.


Once the signal is heard you should start seeing Fitter messages come down the screen


You will also see that the dashboard is populated and updated.

Monday 4 April 2016

Virtual Radar Server and Modes_RX *Funcube*

sudo apt-get install rtl-sdr

wget http://www.virtualradarserver.co.uk/Files/VirtualRadar.tar.gz
tar -zxvf VirtualRadar.tar.gz

To start listening to aircraft using the funcube pro-plus and to start a  SBS-1 compatible server on port 30003 type the following:

modes_rx -d -s osmocom -P

Hopefully you will see the following screen


You may see a few errors here but as long as you get some data all is good. Experiment with a better antenna, etc.


Now if you have already installed MONO skip to step X below

Installing Mono 4

sudo sh -c "echo 'deb http://plugwash.raspbian.org/mono4 jessie-mono4 main' >> /etc/apt/sources.list"
apt-get update

sudo apt-get install mono-complete

Now create a file using your favourite editor in the same directory where you just downloaded virtual radar to

create a file called: VirtualRadar.exe.config
copy and save the below text.
<?xml version="1.0"?>
<configuration>
    <configSections>
    </configSections>
    <startup>
        <supportedRuntime version="v2.0.50727"/>
    </startup>
    <runtime>
        <assemblyBinding  xmlns="urn:schemas-microsoft-com:asm.v1">
            <dependentAssembly>
                <assemblyIdentity name="Mono.Data.Sqlite"
                                  publicKeyToken="0738eb9f132ed756"
                                  culture="neutral" />
                <bindingRedirect oldVersion="2.0.0.0"
                                 newVersion="4.0.0.0" />
            </dependentAssembly>
        </assemblyBinding>
    </runtime>
</configuration>


Open a second terminal window to start Virtual Radar type:
mono VirtaulRadar.exe


Here is my running Virtual radar, you will need to set yours up following the instruction below for the first time.


Under Feed Status, right click on Receiver and then select  configure feed


copy the settings here in the screenshot
127.0.0.1 is the local loop back address on the pi
30003 is the port our SBS-1 server is running on.


click on OK or escape to go back to virtual radar


You can now max out your poor raspberry pi and try opening a web page to see the planes, or better still open a web browser on your pc / laptop to your raspberry pi address on port 8080

for example http://192.168.0.22:8080/VirtualRadar (note capital V and R)
You should not be able to see and monitor planes in the local area.


Wednesday 30 March 2016

Few more club (MX0MXO) eQSL cards

Raspberry pi 3 GQRX SDR radio and fun cube


Please also see our raspberry Pi-3 ready rolled image with latest 2.6 GQRX installed and supporting airspy dongle. Much more stable, click here for the download
I got given a funcube pro plus to play around with so I thought I would see if I could stretch the limits of my Raspberry pi-3 running Raspian Jessie. Well short answer is it works. for those of you who want to try install this here are is a step by step install guide.
<edit>
Following on form the comments below, You will need to increase the CPU speed from its default 700MHz,
Edit the config.txt file in the /boot/ directory and changed the arm_freq setting to:
arm_freq=1300
Save and reboot
</edit>

You could take the card back to your windows PC and edit config.txt with notepad (/boot is a fat32 partition and can be read in windows easily)

Now you can install the software
sudo apt-get update
sudo apt-get upgrade
make sure you have expanded your SD card file system
sudo raspi-config (option 1) and then Finish (reboot now)

sudo apt-get install gnuradio gnuradio-dev
sudo apt-get install gr-osmosdr
sudo apt-get install gr-fcdproplus
sudo apt-get install gr-air-modes
sudo apt-get install pulseaudio
sudo apt-get install libboost1.50-all
sudo apt-get install gqrx-sdr

This takes a little while especially libbost (20 minutes or more)

After all this I powered down the pi, inserted the funcube pro plus, (insert the rtl dongle or whichever) Now power back on

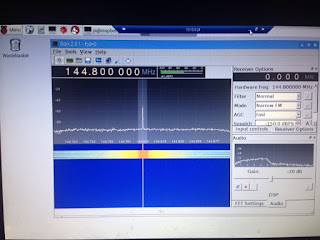
In the GUI (windows) open a terminal window and then type: sudo gqrx

This should on first run open a  config window, once the config is done click on save / close
Within a few seconds you should see the radio interface come up.

If you have any issues you may need to run this as root user, if it freezes hold control and tap c to return to a prompt (terminal window)

to become root type: sudo su
now just type: gqrx

Hopefully this will work for you, any issues let me know, please feel free to cpy and paste full errors

Have fun and enjoy

73

James / M0JFP